
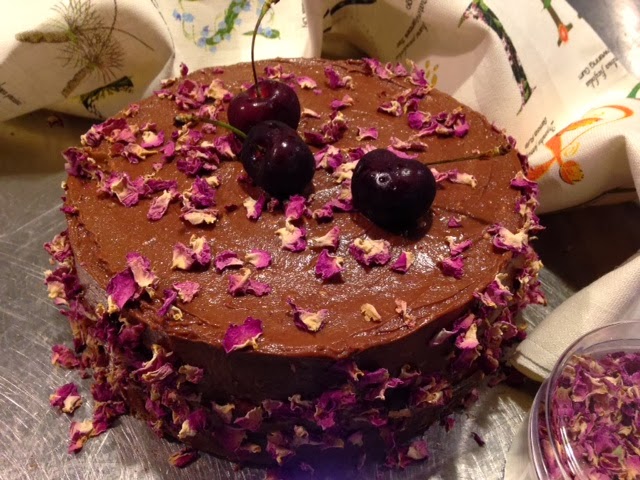
Luscious Australian summer cherries, textured coconut and rich dark chocolate team up beautifully in this decadent Special Occasion Chocolate Layer Cake. I made this for our dear family friends who had invited us to their Saint’s Day dinner celebration this evening.
I followed Nigella Lawson’s recipe for Traditional Chocolate Cake from her “Feast” cookbook . You may have your own favourite chocolate cake recipe which would also serve its purpose as the base of this after dinner dessert. I filled the cake pictured above with plump seasonal cherries and scattered over handfuls of edible fragrant rose petals. You can source these from specialty food stores like The Essential Ingredient in Rozelle. I also used the Lindt 70 per cent dark chocolate imbedded with desiccated coconut. I made a similar cake for my daughter Jana’s 12th birthday last year, substituting cherries for juicy strawberries and using a plain Lindt dark chocolate for a smooth finish.
Part way through dinner I happened to glance at my hands and realised with great embarrassment that they bore the deep burgundy red stains of the cherries I had pitted for the filling of this cake. Must wear gloves next time…
Chocolate Sour Cream Cake
This can be whipped up in either a food processor or with a mixer (stand alone style like a KitchenAid or a handheld electric beater). I have tried both methods and each time the cakes turn put perfectly. The advantage of a FOOD PROCESSOR is that it is FASTER.
Ingredients
175 g unsalted butter
200 g caster sugar
2 large eggs
2 teaspoons vanilla extract
150 ml sour cream
200 g plain flour
1 heaped teaspoon baking powder
1/2 teaspoon baking powder
40 g good quality cocoa (I use Cadbury Cocoa, readily available from supermarkets)
One hour before starting this cake, take all the cold items out of the fridge to bring them to room temperature. This allows all the ingredients to combine smoothly avoiding unpleasant lumps.
Preheat the oven to 180 degrees on a conventional setting and grease and line two 20 cm cake tins. I use cake tins with removable bases which makes it easier to tip the cakes out onto a cake rack once cooked. It is VERY IMPORTANT to use the correct sized cake tins. Too large and your cakes will resemble a biscuit and burn. Too small and your mixture will overflow and remain raw in the middle.
USING A FOOD PROCESSOR – Put the butter, sugar, eggs, vanilla and sour cream in a food processor and blitz until smooth. Add all the other ingredients and blend again until there is a thick, smooth chocolate coloured batter in the bowl. You will need to stop the machine a couple of times to scrape down the mixture from the sides to ensure everything is well combined.
USING A MIXER – Cream the butter and sugar until pale and thick. Then add the vanilla and eggs and beat until combined. Add all the remaining ingredients, and start to beat the mixture on a low setting to prevent the flour and cocoa from flying up out of the bowl in a cloud of edible dust. Once the ingredients start to blend together, increase the speed and continue to beat until smooth, thick and blended. As per the food processor method, you will need to stop halfway through blending and scrape the mixture off the sides with a spatula.
Divide the mixture evenly between the two cake tins. I use a food scale to measure the weight of each filled tin to ensure an accurate spread of batter.
Place the tins into your oven and bake for 30 minutes. As ovens vary, I recommend you check at the 25 minute mark by inserting a skewer into the middle of the cake. If it is clean and the cakes have come away from the sides of the tin, then they are ready. If not leave for another 5 minutes only – no longer than this.
Cool in the tins for 10 minutes then turn out on a cake rack to cool completely before icing and decorating.
Chocolate Golden Syrup Icing
Ingredients
75 g unsalted butter
175 g dark chocolate with 70% cocoa butter content (I use Lindt with coconut which is a variation of the plain variety)
300 g icing sugar
1 tablespoon golden syrup
125 m sour cream
1 teaspoon vanilla extract
Optional extra:
Two handfuls of the most plump, ripe, fresh cherries you can find, washed, dried, pitted and sliced.
Melt the butter and chocolate, either in the microwave or in a bowl suspended over a pot of simmering water on the stove. TAKE CARE NOT TO LET THIS BURN!
Scrape this mixture into a large mixing bowl or food processor, add all the other ingredients and beat together until combined and silky smooth.
Spread part of the icing onto one half of the cake, top with sliced cherries layered in a circular pattern. Spread a little more icing on the other half of the cake and place this on top of the filled round. Use the remaining icing to cover the sides and top of the cake completely. I wanted to achieve an imperfect finish, and so with my final layer of icing, I used my stainless steel cake decorating spatula in a “swirling” motion to achieve the desired effect as pictured.
1 Comment
Thank you Magdalena for this wonderful cake. It topped off our night! Everyone was fighting over the last piece…