 |
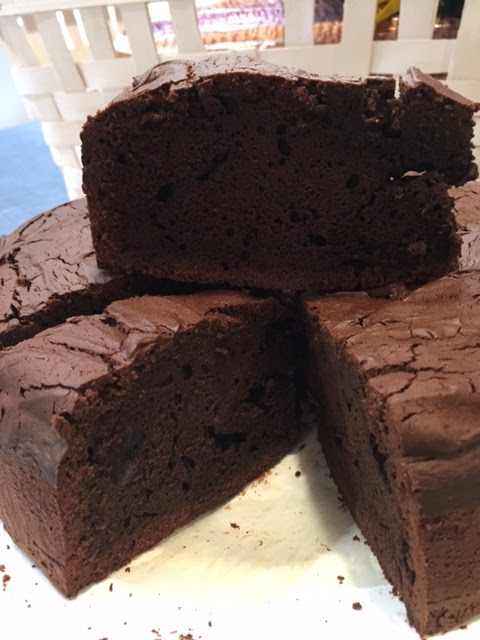
| The top of the cake will take on a crackled earth like look which adds to its irresistible appeal. Try not to lick the screen… |
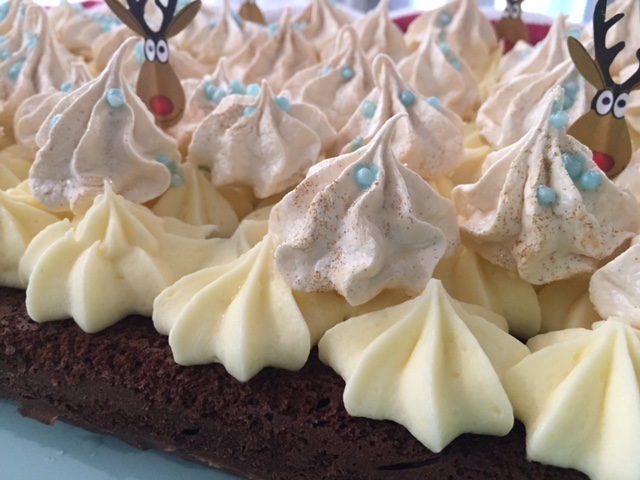 |
| If you don’t have patience to make meringues, pick up a bag from your local grocery store. I’ve dusted these with edible glitter for added glamour. |
It’s hard to believe that this soft, marvellously moist and tasty chocolate cake is wheat gluten and nut free…but it is really is! You don’t need to be food intolerant to enjoy it either. It’s certainly not second best. My brood of six wolfed down their slices and were surprised it was gluten free because it is so moist. I find it really satisfying to tinker with ingredients and develop new recipes and that’s just what I did here, to produce what I think is the “Ultimate Gluten Free Chocolate Cake”.
This recipe works in a traditional deep round cake tin as in the first picture above, or as vast a slab-style creation topped with yummy edible decorations and ideal for feeding a crowd. I did the latter when I turned this recipe into a celebratory cake for an end of school year class party. I was aware of nut and wheat allergies amongst the children and didn’t want to risk anyone having a terrible reaction in the midst of all the fun. I added a festive touch to this version with hand piped meringues, vanilla buttercream and paper reindeer faces peeking out.
With the festive season upon us, my Ultimate Gluten Free Chocolate Cake could be used in a variety of ways: as the base of a rich and creamy trifle; dusted with icing sugar and served with cream or ice-cream as part of a dessert buffet; or layered and smothered with chocolate ganache and topped with plump Australian cherries. Wow! A decadent dessert worthy or your next special gathering with family and friends.
Ultimate Gluten Free Chocolate Cake to serve 16 – 20 people as a round cake or 30 -35 people as a slab cake depending on the size of the slices.
Ingredients
250g unsalted butter cut into cubes
250g good quality dark chocolate such as Lindt or Callebaut (cocoa butter content of about 55% but no less)
1 teaspoon Queen brand vanilla bean paste or 4 teaspoons vanilla extract/essence
300g caster sugar
4 large eggs (organic or free range)
200g gluten free flour (I used White Wings brand)
50g cocoa powder
1 tsp baking powder
4 tablespoons buttermilk
Step 1 – Preheat the oven to 160 degrees fan forced. Lightly grease and line your preferred cake tin; either a 23cm round springform tin or a rectangular tin measuring 37cm x 27cm.
Step 2 – Place the butter and chocolate in a heat proof bowl and melt. You can do this either by resting the bowl over a pot of simmering water on the stove, or placing the bowl in a microwave for about 90 seconds (this may vary depending on the strength of the microwave).
Step 3 – Using an electric mixer whisk together the eggs, sugar and vanilla until the mixture takes on a full, fluffy pillow-like appearance and the creamy surface is dotted with lots of little bubbles. This takes about 3 minutes.
Step 4 – Sift in the gluten free flour, cocoa powder and baking powder and then pour in the buttermilk. If you don’t have buttermilk, put 4 tablespoons of full cream milk into a cup and squeeze in a tablespoon of lemon juice. Wait a minute and the mixture will start to curdle which is then perfect to use. Whisk together until completely combined and smooth. This takes about 4 – 5 minutes, starting on a low setting to avoid the dry ingredients billowing up and then increase to a medium-high setting.
Step 5 – Using a flexible spatula and scrape out all the lovely, rich chocolate mixture into your chosen baking tin. Smooth over the surface so that it is even and place in the oven. The deep round cake will take 50 minutes to cook. The rectangular cake takes 20 minutes because it is thinner and has a larger surface area. If you are making a trifle, use the rectangular tin.
Step 6 – Cool in the tin for 15 or so minutes before turning out onto a cake rack to cool completely before decorating. This is also especially delicious eater warm with lots of lovely ice-cream or whipped cream melting alongside.
TIPS
* Don’t be tempted to just pile all the ingredients into a bowl, the method is essential to creating an aerated, velvety bit of baking bliss.
* When melting the chocolate and butter, do not allow any water into the bowl as it will turn the mixture into a clumpy mess. If you use the microwave, take care not to let it burn. If the chocolate is tainted at this point you will need to throw the lot out and start again. Such a waste!
* Good quality chocolate results in a great tasting cake. Don’t skimp on the chocolate by reaching for a “cooking chocolate”. The higher quantity of cocoa butter in quality chocolate gives the finished cake its rich flavour and smooth satisfying texture.
* Please don’t be tempted to leave the cake in longer than required because the quantity of chocolate and sugar will retain the internal heat and continue in effect, to cook the cake once it is out of the oven.
* Rectangular tins have a solid base, so you will need to gently tip the cooked cake onto a cooling rack about 15 minutes after it comes out of the oven.
* An undecorated Ultimate Gluten Free Chocolate Cake can be stored in an airtight container for 2 days.
Comments are closed here.