
A regular reader and food enthusiast herself, has just pointed out to me that the recipe for Fancy Fondant Covered Cookies is nowhere to be found. After perusing Cabinet of Cookery myself I too could not find the recipe, only several appetising images.
Despite baking and decorating these beautiful vanilla scented delights numerous times for various events, I had somehow omitted actually publishing the recipe! I guess this is a consequence of late night, bleary eyed blogging which usually occurs once all the other necessary family, domestic, school and work related tasks have been tended to. It’s surprising just how quickly 11 o’clock creeps up when one is busy.
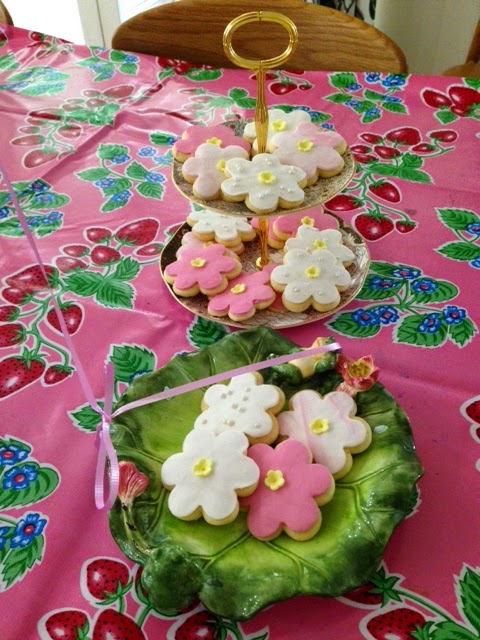
These edible delights have a touch of frivolity with the addition of sugared decorations or illustrations and fondant, which can be easily be hand tinted to suit your preferences or the celebration at hand. So to everyone who may have been searching my site for the recipe, have your cookie cutters at the ready because finally, here it is!
Fancy Fondant Covered Cookies
This quantity makes between 18 – 24 cookies depending on the size of your cutters. Cooled cookies (with or without fondant) will keep for up to 4 weeks in an airtight container at room temperature. The ingredients are as from The Australian Women’s Weekly Cake Decorating book (a home cook can always rely on that triple testing of theirs!). I have altered the method slightly and this works well too.
Ingredients
125g unsalted butter
150g caster sugar
1 teaspoon vanilla extract
2 eggs
200g self raising flour
150g plain flour
*plus extra plain flour for rolling and cutting
To decorate:
500g white fondant
food safe gel colouring
cornflour
1 egg-white, lightly beaten with a fork
The butter and eggs need to be taken out of the fridge 30 – 60 minutes prior to using them so that they can be at room temperature.
Place the butter, sugar and vanilla extract in mixing bowl and using an electric mixer, beat until smooth and combined. Do not keep beating in order to make the butter become pale. This is not necessary.
Add the eggs one at a time, beating each one in until just combined.
Add the sifted flours and beat in slowly until a smooth, soft dough forms.
Turn the dough out onto a lightly floured surface and kneed lightly into a smooth ball. Place back in the mixing bowl, cover with plastic wrap and place in the fridge for 30 minutes.
In the meantime, preheat the oven to 180 degrees on a conventional setting. Line your baking trays with non-stick baking paper and select your cookie cutters.
Once the dough has rested enough, remove from the fridge and roll out on a lightly floured surface, using a rolling pin. For the best results, roll out the dough to a thickness of about 5mm (they will rise due to the addition of the self raising flour).
Cut out your shapes and lift onto the baking trays using a flat wide palette knife. Leave room between the cookies to allow for expansion while baking.
Bake in the oven for about 10 minutes or until a light golden brown.
Remove from the oven when ready and wait for 5 minutes before transferring onto wire racks to cool. The cookies must be COMPLETELY COOL before fondant and decorations are applied, otherwise the pretty adornments will simply slide off and melt.
To decorate, roll out your chosen fondant on a clean bench, sprinkling it first with cornflour to prevent sticking. It should be about 3mm on thickness. Use the same cutters to press out shapes.
Brush the surface of each cookie with a little lightly beaten egg white before carefully applying the shaped fondant. I use a small natural bristle pastry brush to do this. The egg-white will allow it to stick. If you would like to add sugared decorations such as flowers or edible metallic coloured cachous, simply dab extra egg-white onto the fondant using a clean, fine tipped artists paint brush.
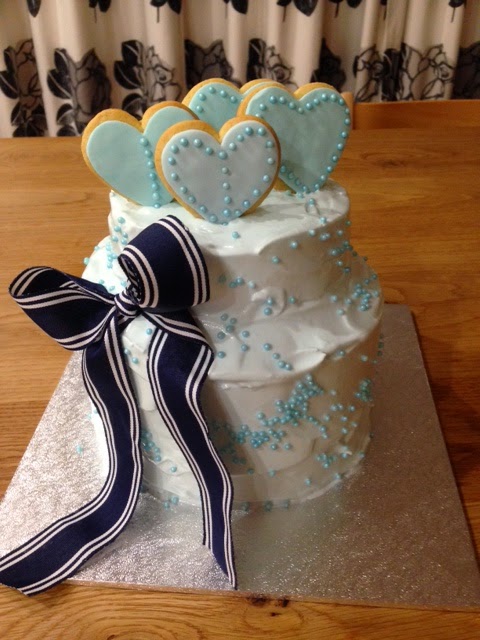
Your fancy cookies are now ready to serve or store or grace the top of a special occasion cake as pictured below. Tip – If you are intending on topping your decorated cake with fancy fondant cookies, you will need to insert a thick skewer or slim line wooden ice-cream stick into the base of each cookie BEFORE the batch goes into the oven. It’s a little tricky at first, but do this carefully and the raw dough will bake hard around the wooden supports allowing you to press them into the cake when needed.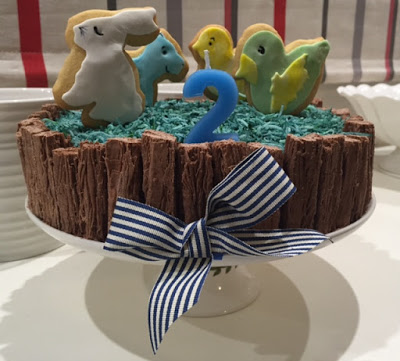
This quantity makes between 18 – 24 cookies depending on the size of your cutters. Cooled cookies (with or without fondant) will keep for up to 4 weeks in an airtight container at room temperature. The ingredients are as from The Australian Women’s Weekly Cake Decorating book (a home cook can always rely on that triple testing of theirs!). I have altered the method slightly and this works well too.
Ingredients
125g unsalted butter
150g caster sugar
1 teaspoon vanilla extract
2 eggs
200g self raising flour
150g plain flour
*plus extra plain flour for rolling and cutting
To decorate:
500g white fondant
food safe gel colouring
cornflour
1 egg-white, lightly beaten with a fork
The butter and eggs need to be taken out of the fridge 30 – 60 minutes prior to using them so that they can be at room temperature.
Place the butter, sugar and vanilla extract in mixing bowl and using an electric mixer, beat until smooth and combined. Do not keep beating in order to make the butter become pale. This is not necessary.
Add the eggs one at a time, beating each one in until just combined.
Add the sifted flours and beat in slowly until a smooth, soft dough forms.
Turn the dough out onto a lightly floured surface and kneed lightly into a smooth ball. Place back in the mixing bowl, cover with plastic wrap and place in the fridge for 30 minutes.
In the meantime, preheat the oven to 180 degrees on a conventional setting. Line your baking trays with non-stick baking paper and select your cookie cutters.
Once the dough has rested enough, remove from the fridge and roll out on a lightly floured surface, using a rolling pin. For the best results, roll out the dough to a thickness of about 5mm (they will rise due to the addition of the self raising flour).
Cut out your shapes and lift onto the baking trays using a flat wide palette knife. Leave room between the cookies to allow for expansion while baking.
Bake in the oven for about 10 minutes or until a light golden brown.
Remove from the oven when ready and wait for 5 minutes before transferring onto wire racks to cool. The cookies must be COMPLETELY COOL before fondant and decorations are applied, otherwise the pretty adornments will simply slide off and melt.
To decorate, roll out your chosen fondant on a clean bench, sprinkling it first with cornflour to prevent sticking. It should be about 3mm on thickness. Use the same cutters to press out shapes.
Brush the surface of each cookie with a little lightly beaten egg white before carefully applying the shaped fondant. I use a small natural bristle pastry brush to do this. The egg-white will allow it to stick. If you would like to add sugared decorations such as flowers or edible metallic coloured cachous, simply dab extra egg-white onto the fondant using a clean, fine tipped artists paint brush.
Your fancy cookies are now ready to serve or store or grace the top of a special occasion cake as pictured below. Tip – If you are intending on topping your decorated cake with fancy fondant cookies, you will need to insert a thick skewer or slim line wooden ice-cream stick into the base of each cookie BEFORE the batch goes into the oven. It’s a little tricky at first, but do this carefully and the raw dough will bake hard around the wooden supports allowing you to press them into the cake when needed.

Comments are closed here.